Mandolin 101
Lesson Three
In this third installment, we are going to look at the Major scale.
Knowing scales is almost as important as chord knowledge on a mandolin because many of the parts you will play involve switching between chords and brief scale
based runs within the structure of the arrangement of many tunes you will encounter. So you need to get your fingers used to the idea of playing single note runs.
So, let's start with the one scale you absolutely need to know, the Major scale. This scale is the heart of all other scales, and the foundation in
understanding chord construction, two topics we'll cover in later installments.
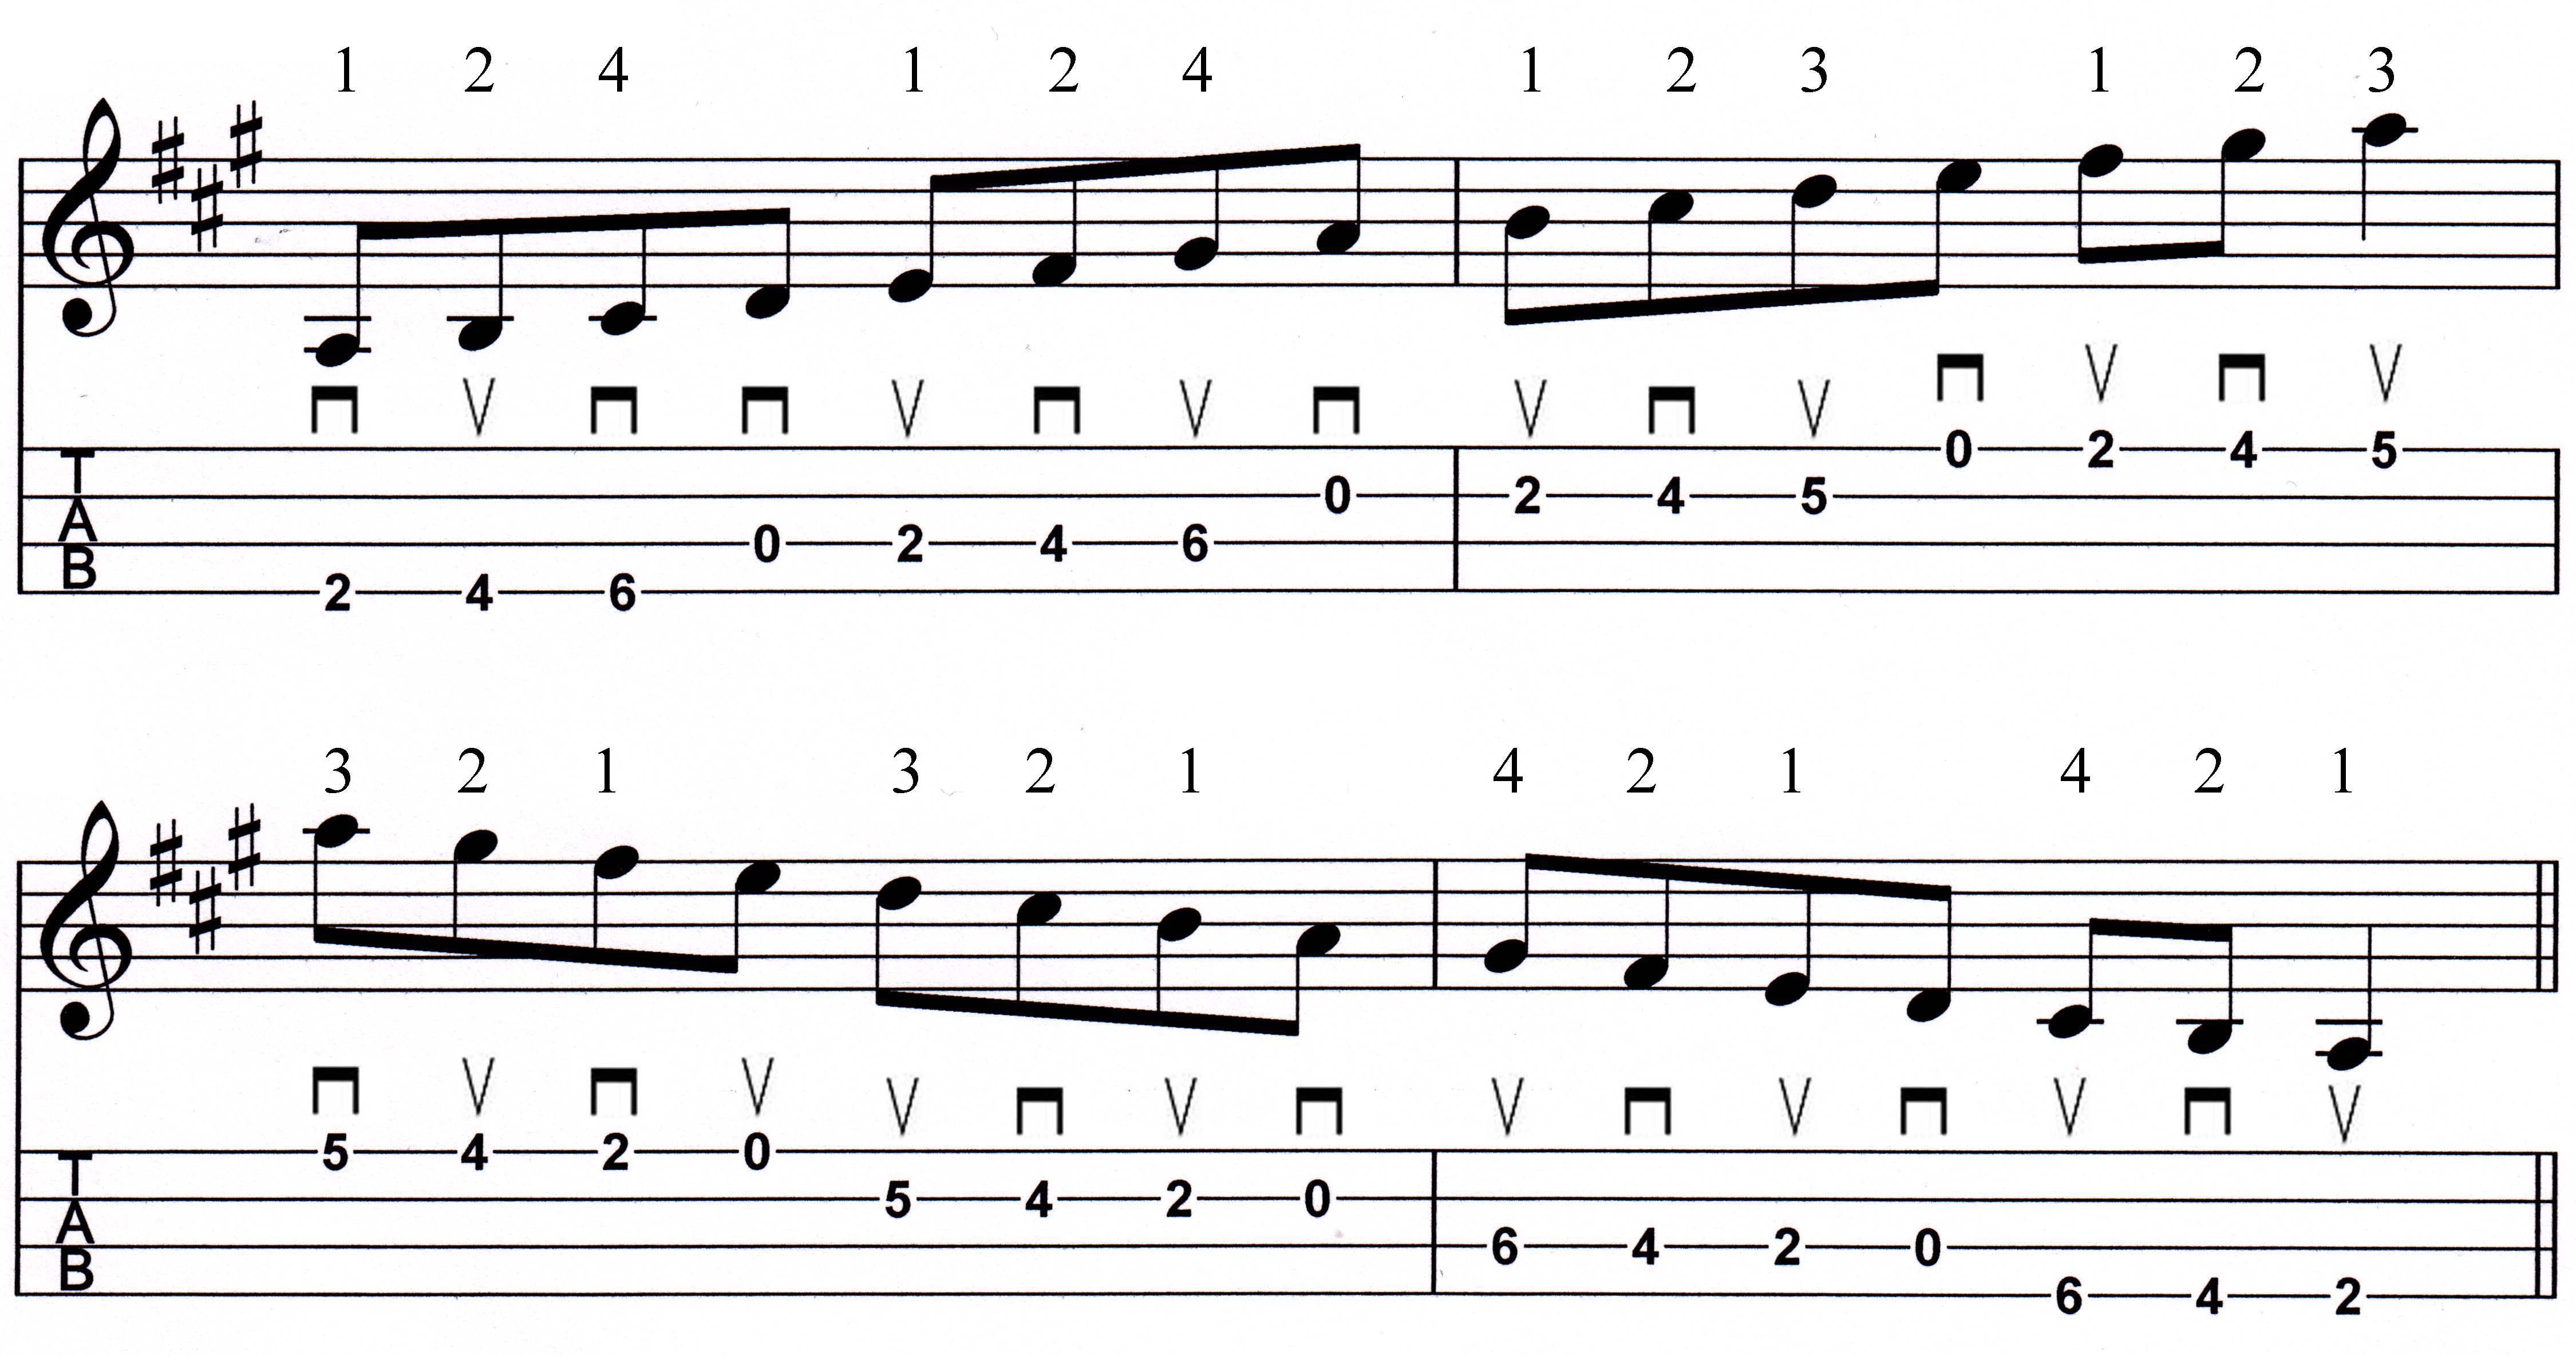
The lowest note on a mandolin is G, so it is an obvious place to start. Therefore, let's lay out the G Major scale. It's really quite easy to learn.
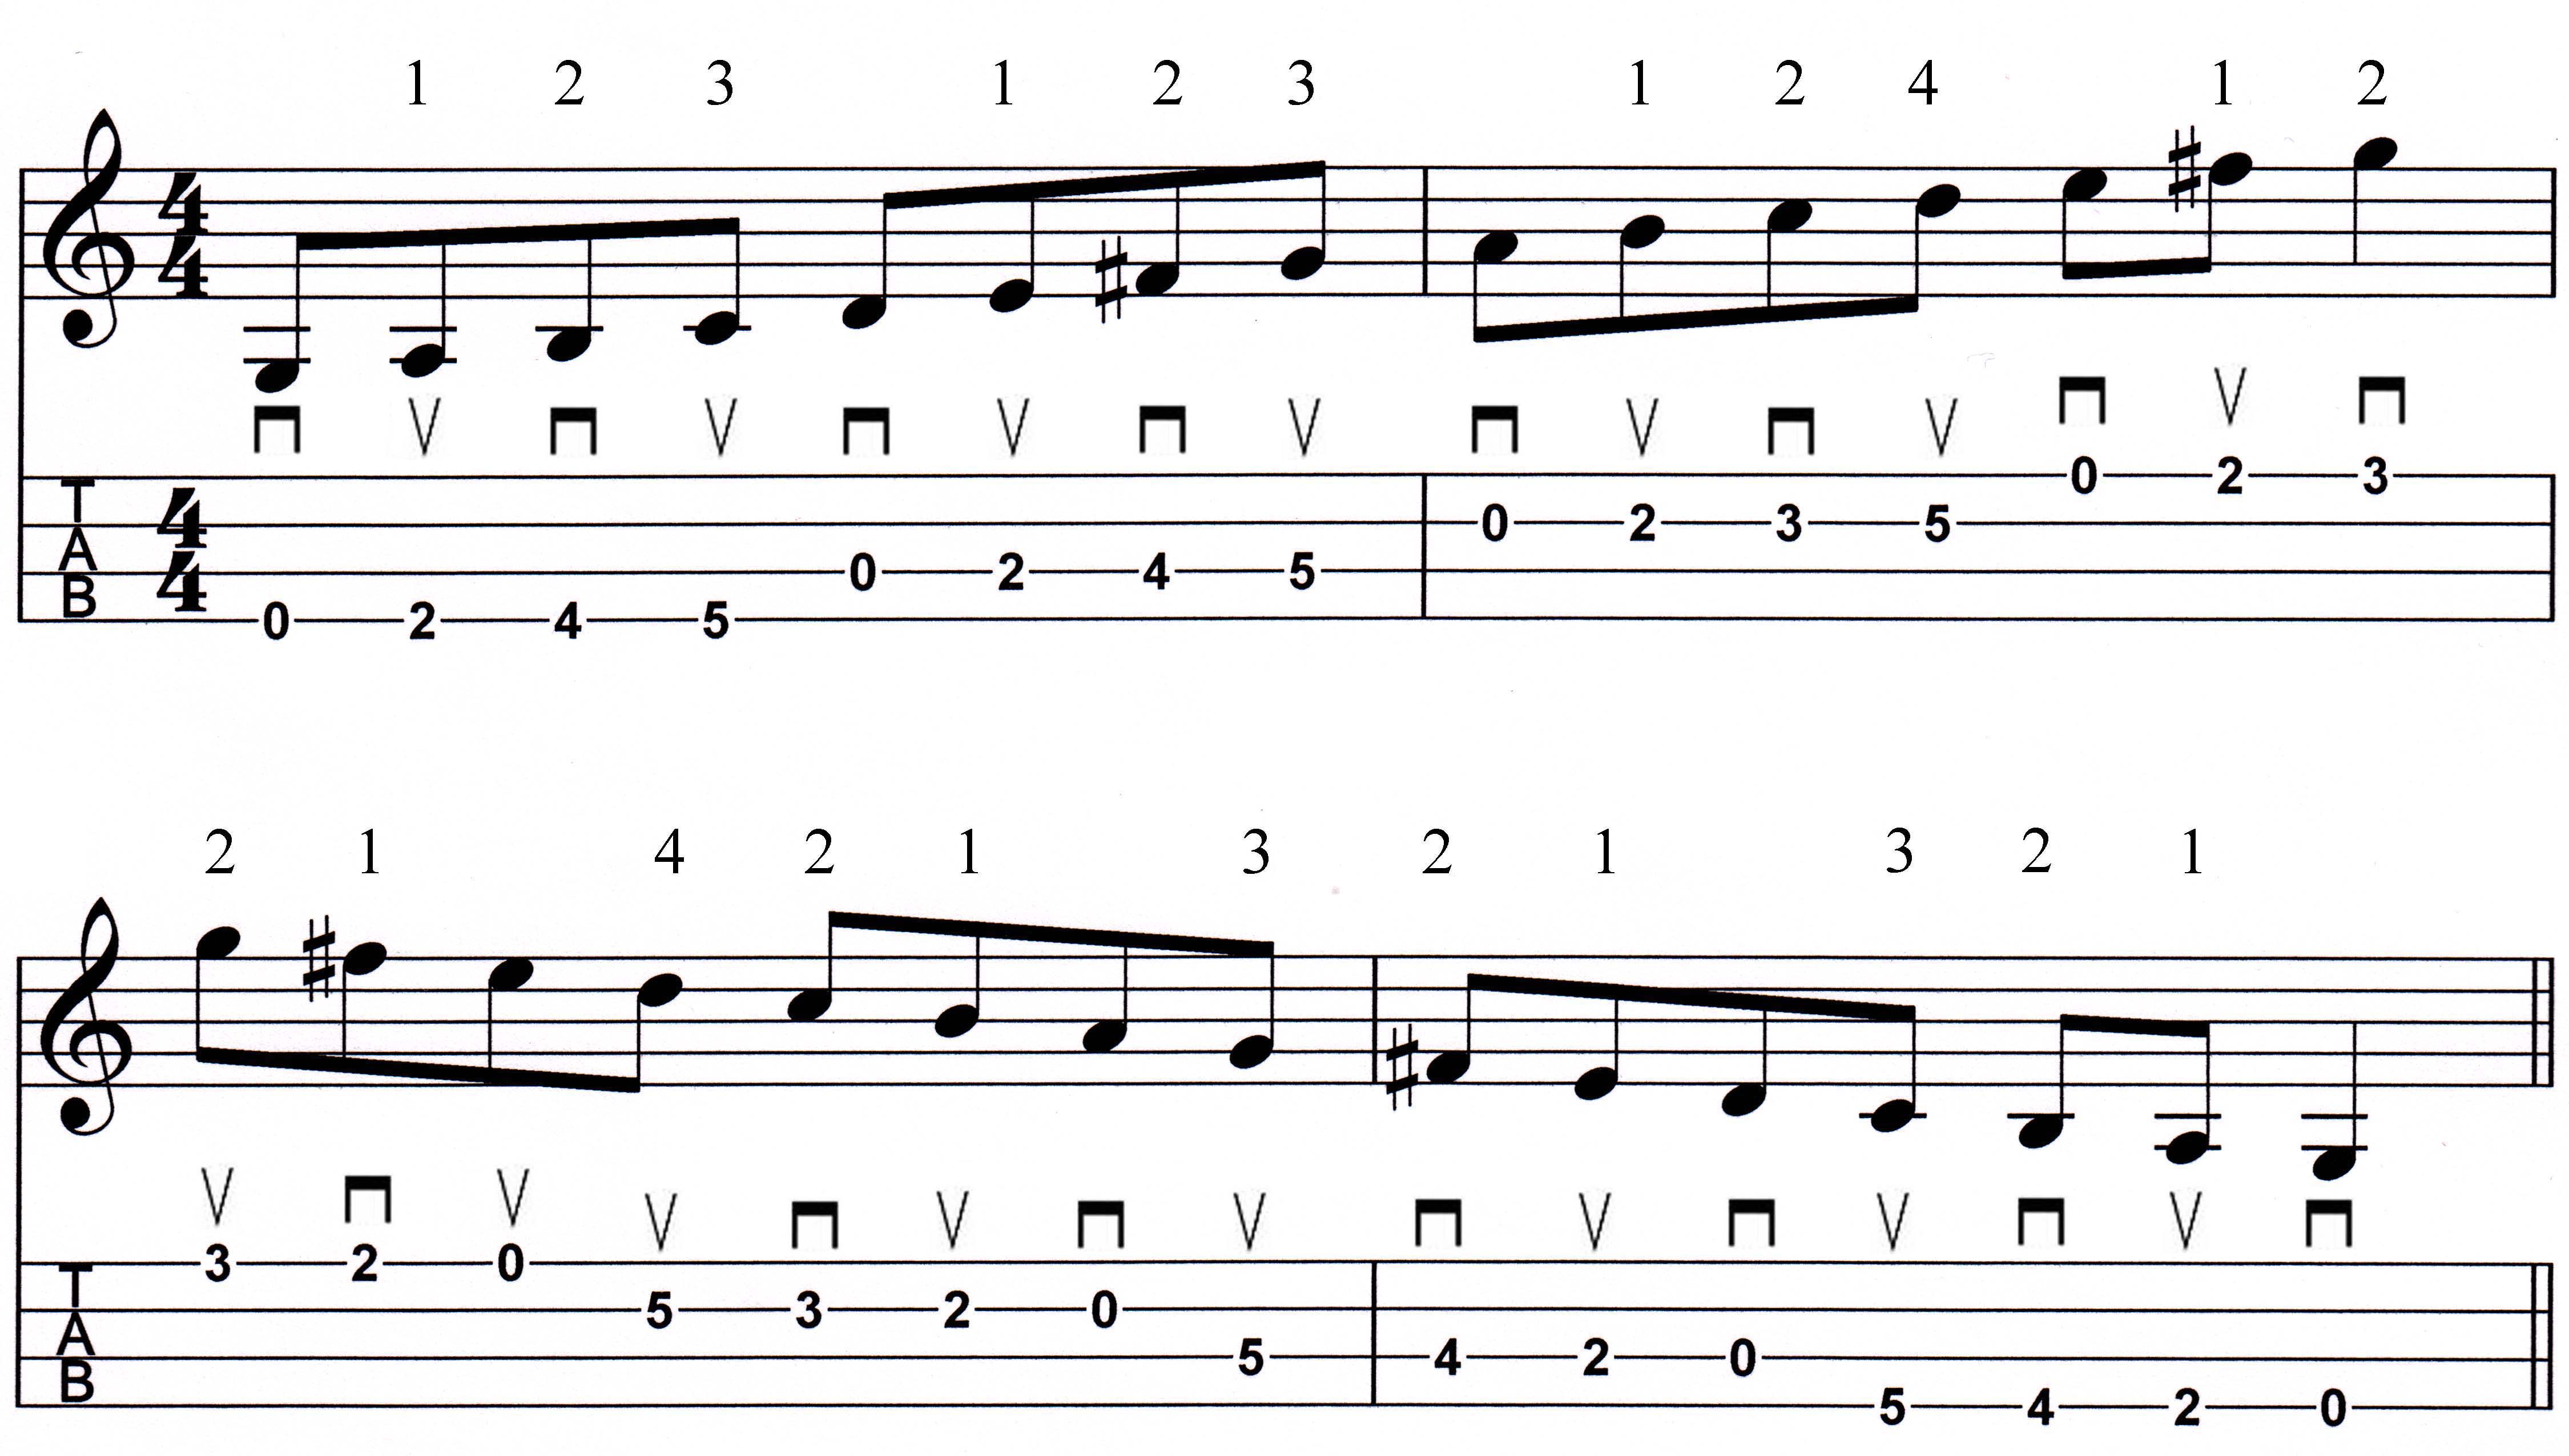
In the following graphic, you will see the G Major scale in the first position, which uses open strings as part of the pattern in playing this scale. The numbers
above the notes is the suggested fingering to use. Start with that, and adapt the way you play the scale to your fingers and comfort. But the one thing you must do
is to be consistent in your approach - the way you play a scale at any given position. It will help you learn faster and become more fluid if you can
repeat things the same way every time.
Note: The  symbol means down stroke with the pick; and
the
symbol means down stroke with the pick; and
the  symbol means up stroke with the pick.
Take your time to get comfortable. Your thumb can be on the back of the neck, or you can cup the neck in the space between your thumb and first finger. There is no
"wrong" way to play here, but some are more restrictive than others. Choose wisely, based on your physical attributes and abilities; then be consistent! This is
important in playing any instrument, a repeatable and consistent approach in executing a given technique.
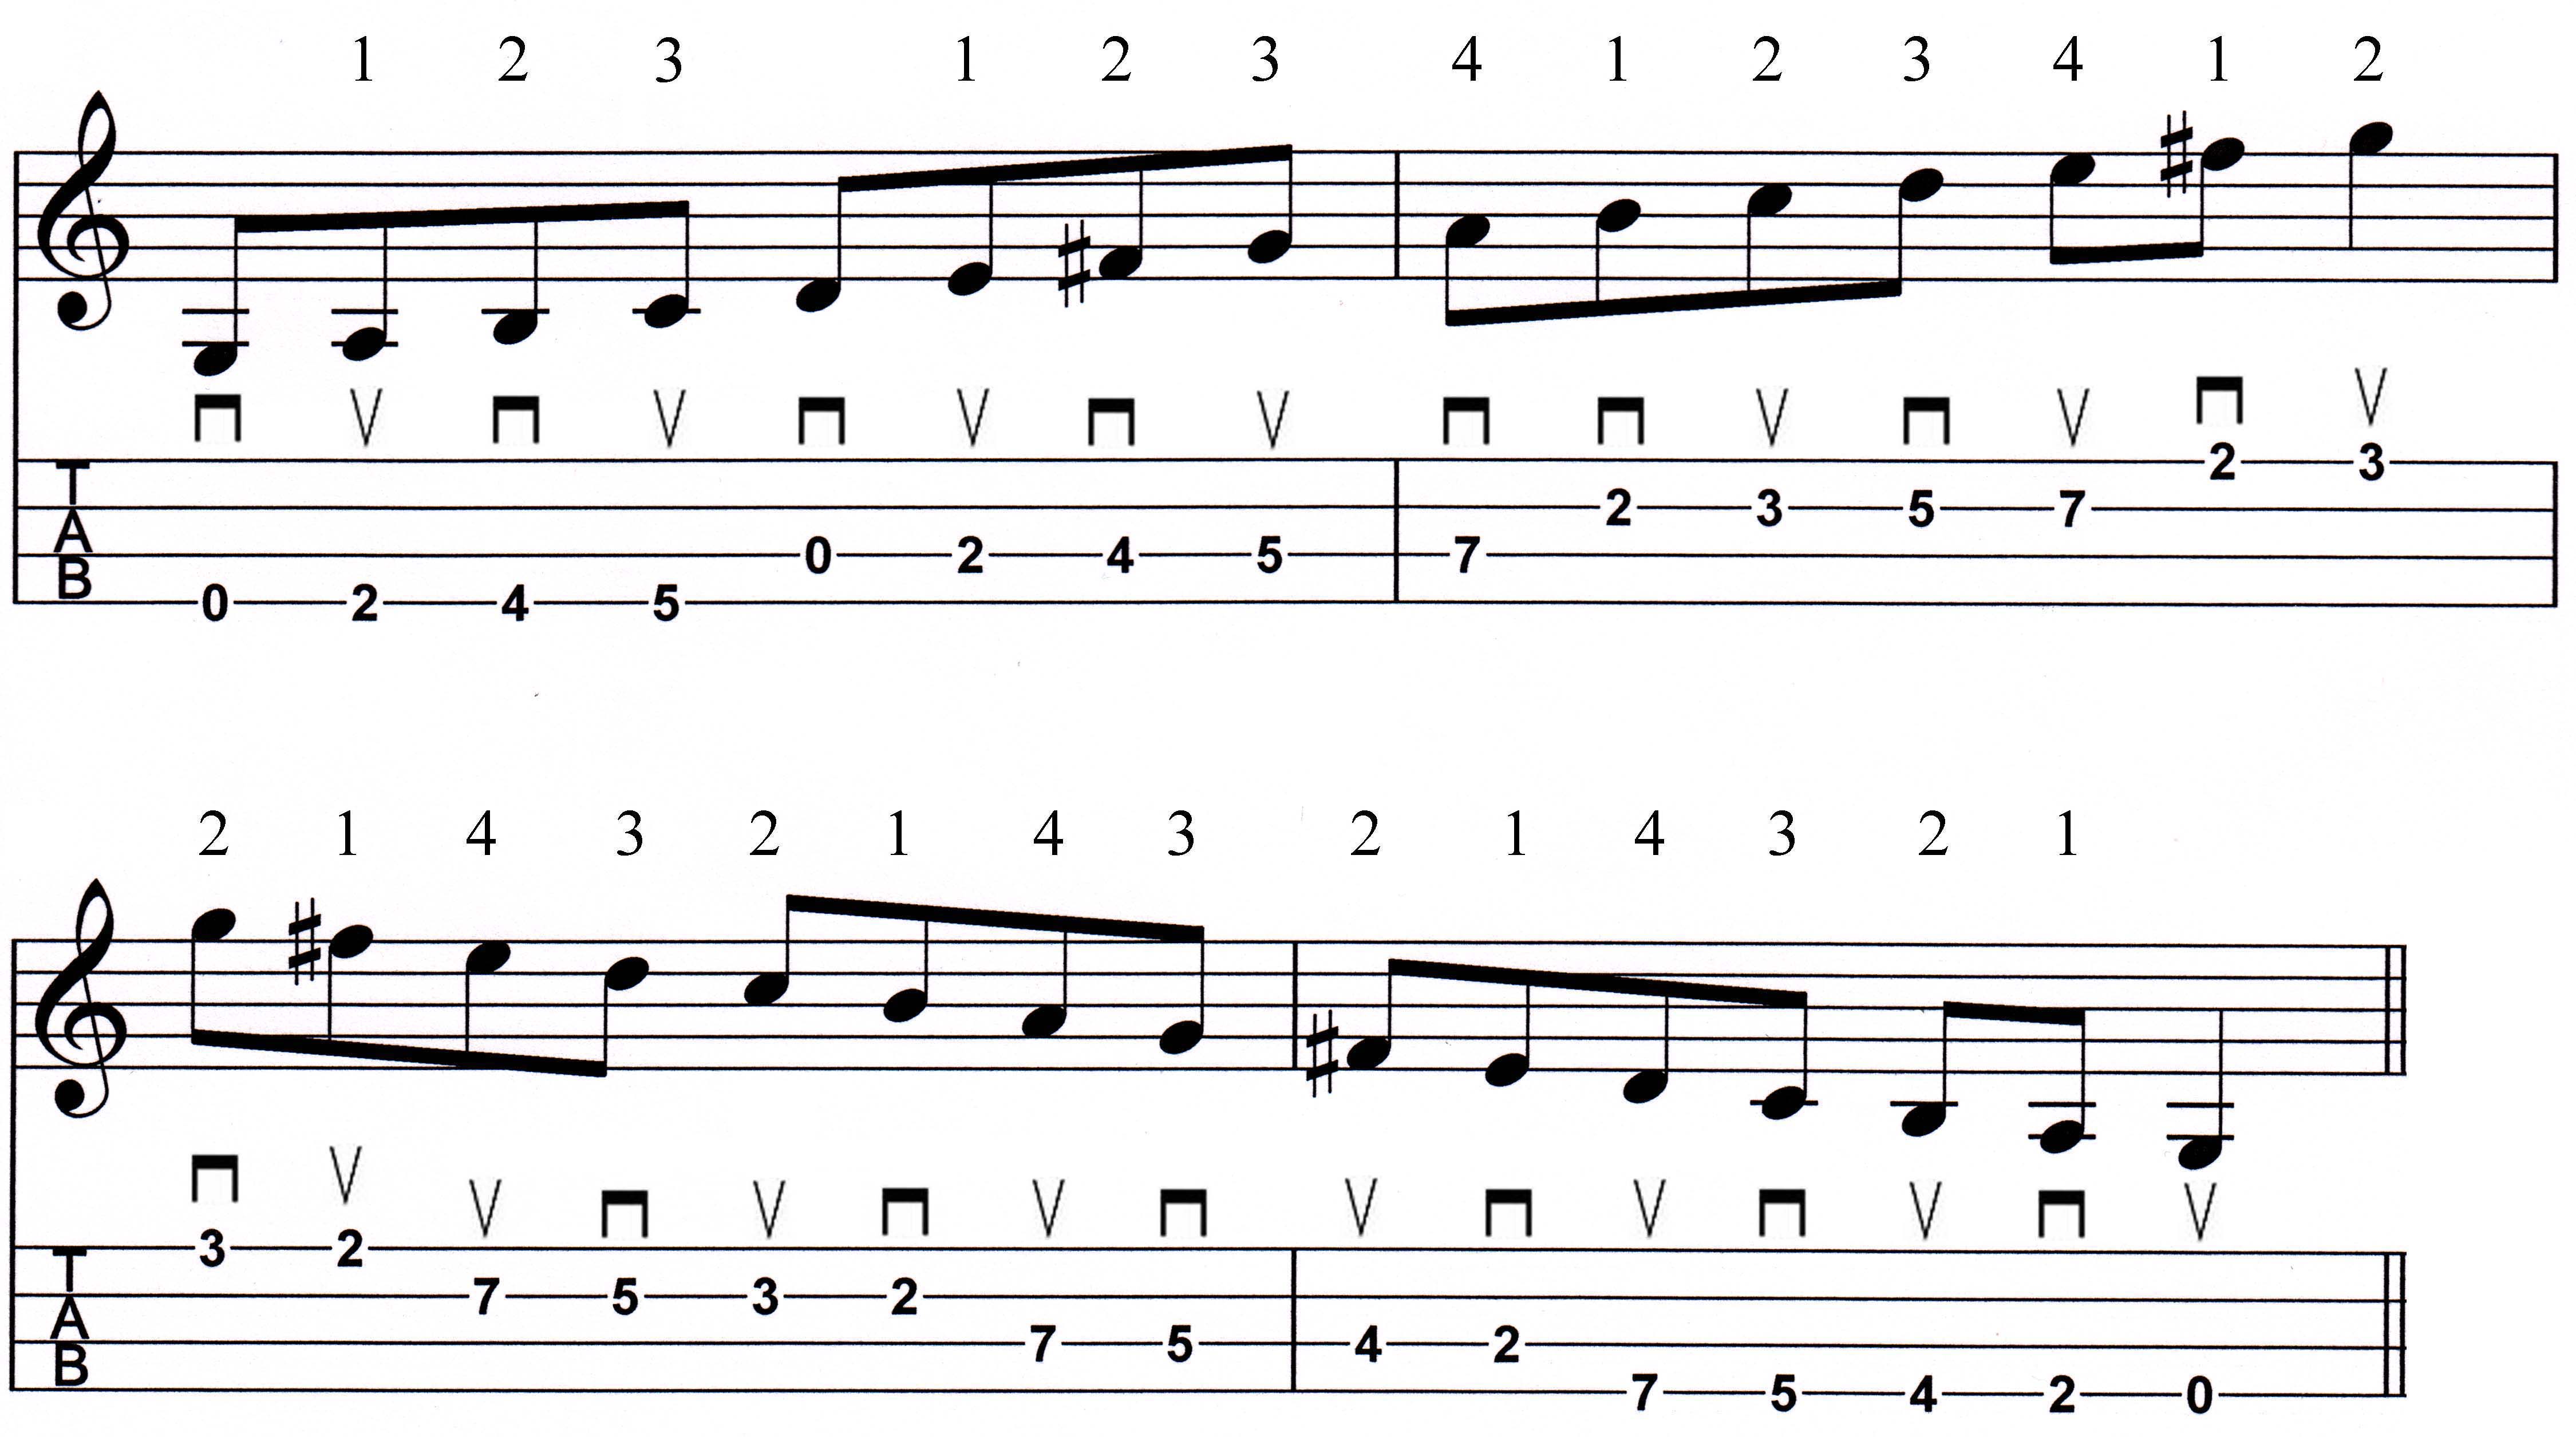
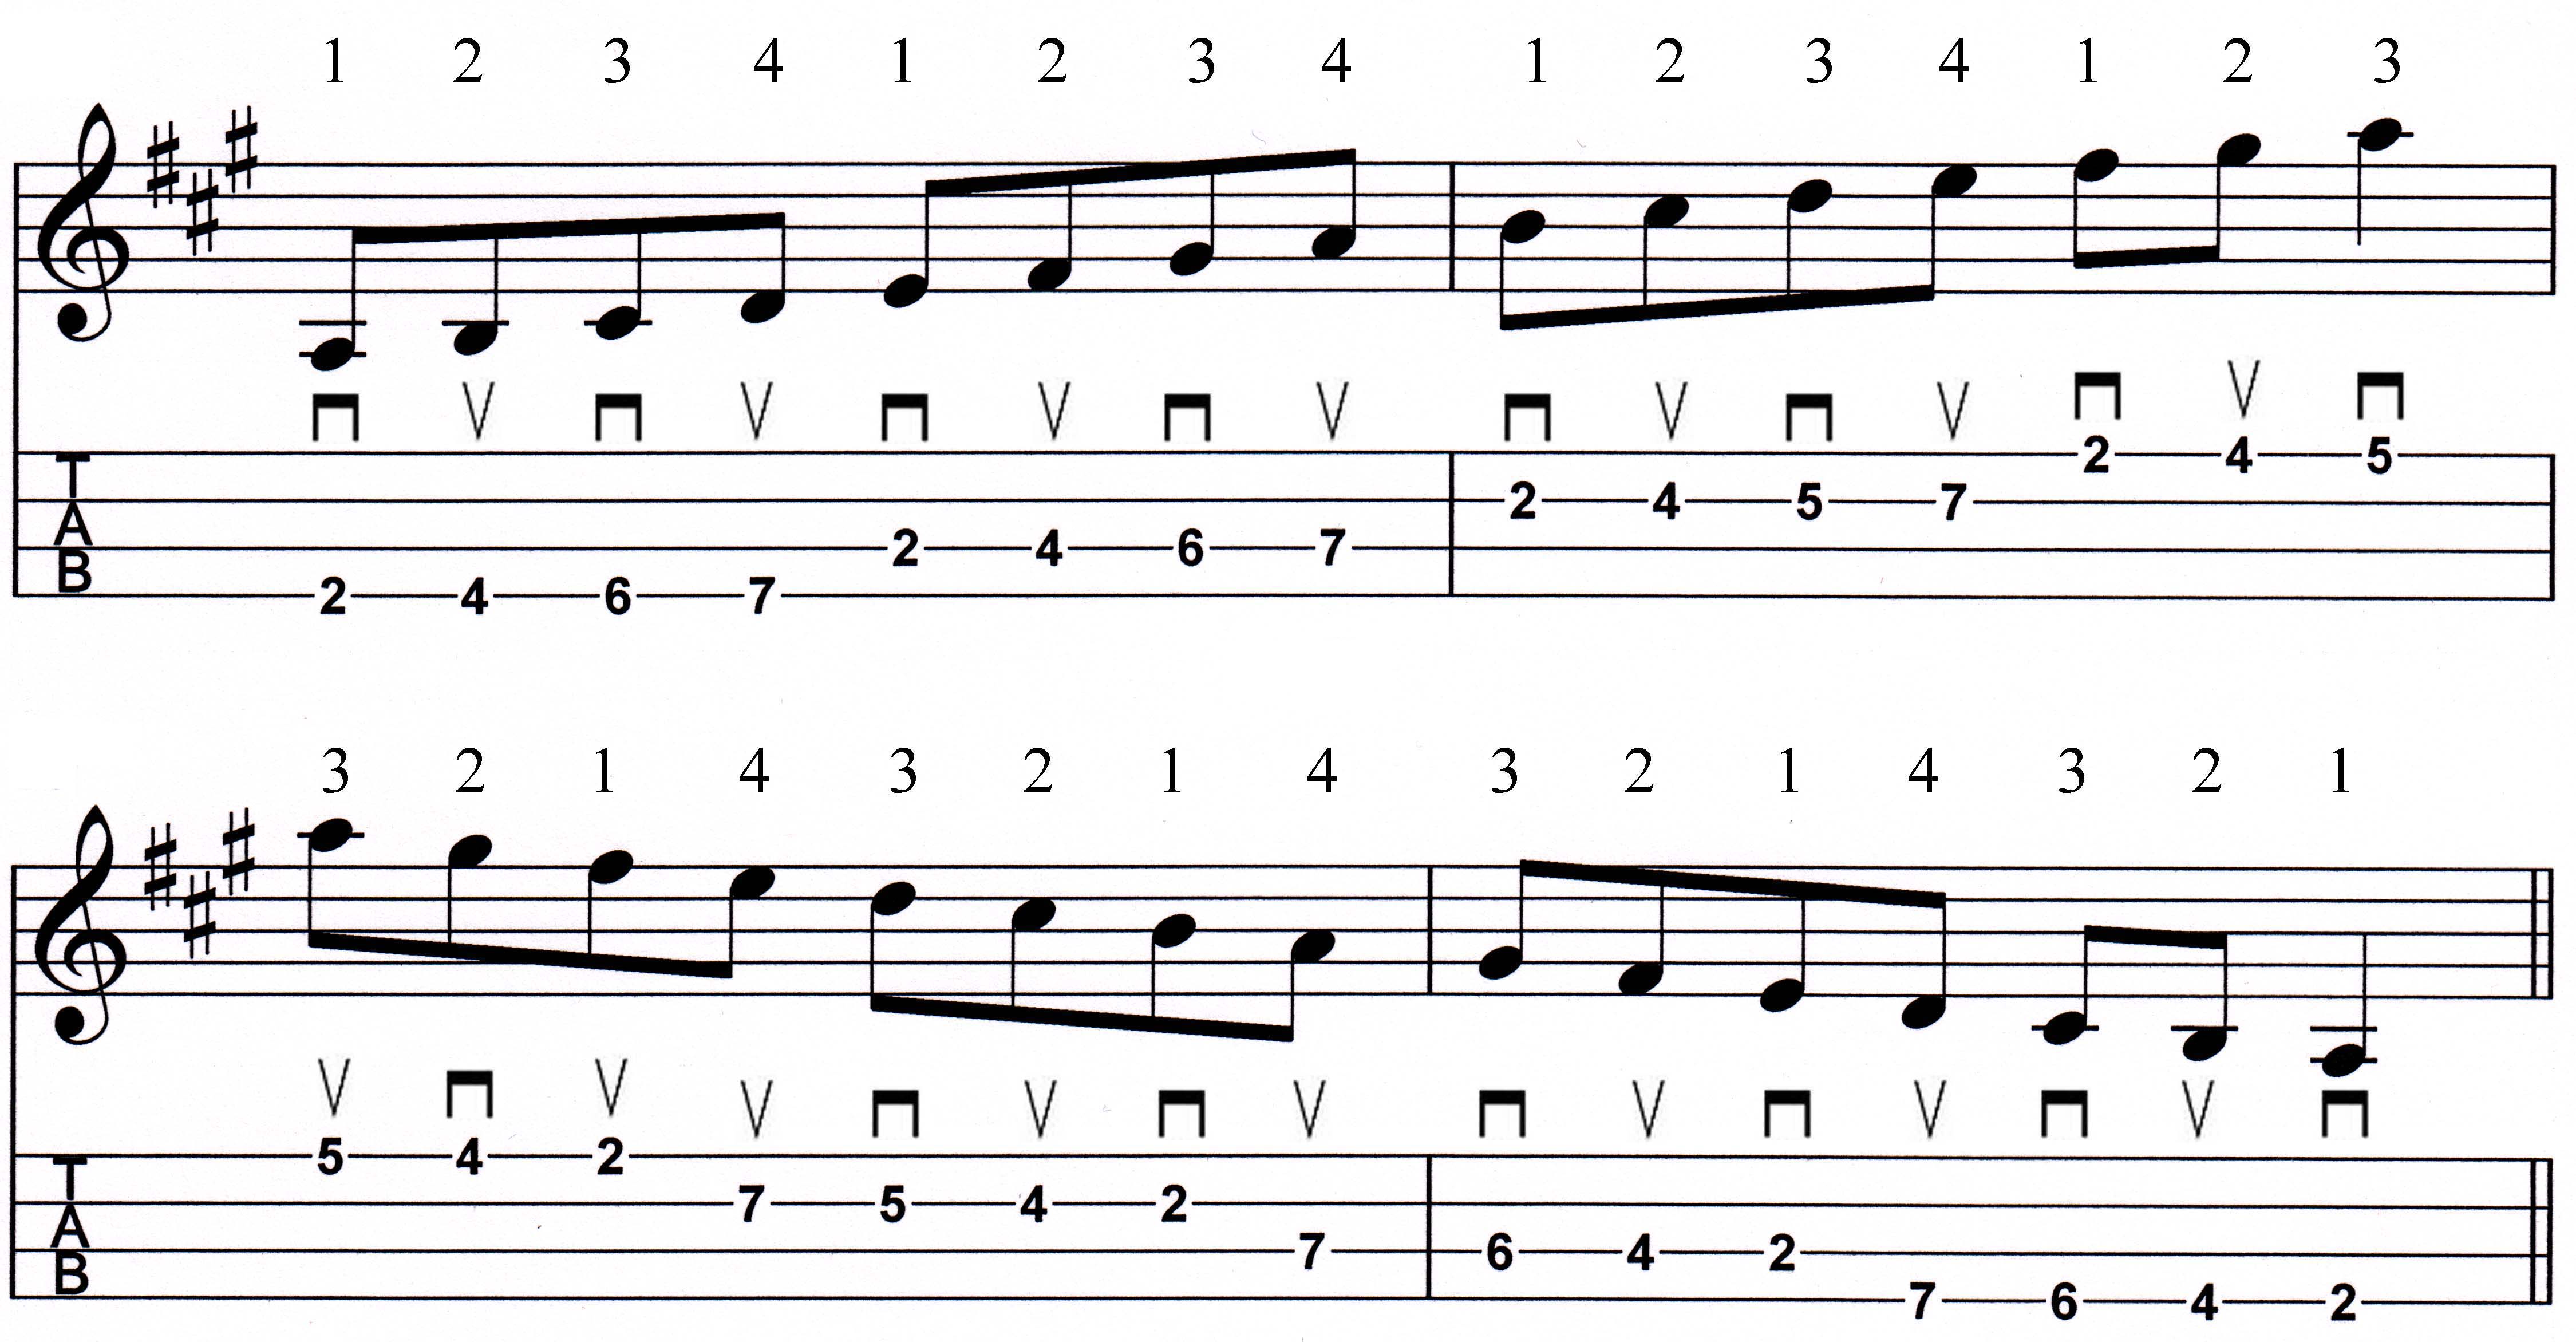
Next up is the same scale, but with more fretted notes, and fewer open string notes. Again, the fingering is suggested, not cast in stone. This is what works for me.
Go slow, figure it out, make your method common sensible and repeatable. You'll get it. Be patient and allow yourself the time it will take to get good at it. Take
note that the ending of the descending part of the scale is slightly different than the ascending beginning of the scale.
Part of what you want to be working out, as you become more familiar with and comfortable playing single notes, is to produce good tone, and consistent volume
from note to note. That means you have to pay attention to fingering - how your fingers press into the strings. You don't want to be straight up and down; an angle
of about 30-40% is good, except for the pinky. The pinky will tend to lay flatter, which you'll find is pretty typical player to player. That said, some chords may
require a vertical attack for one or more of the fretted notes.
You also want notes to be equally loud, or equally soft. Along with good fretting technique, "proper" picking technique is also important. How you hold a pick is
really very subjective, everyone is a little different. But the one thing you want is to not let the pick dig "deep" into the string plane. So you want to hold the
pick with just a little bit of the tip exposed. This will also help you not lose the pick very often. How hard you grip the pick is also subjectve. But a good rule
is to not squeeze the pick any harder than is necessary to keep it from flying out of your fingers during strumming and picking passages.
Good picking technique is the means to volume control; it will allow you to control the attack, how hard or soft you strum or pluck the strings. As you learn to play
single note runs, and chords as well, try to be more aware of how well you maintain a consistent volume, how you "attack" the strings, through a passage or
whole tune.
Now we're going to get a bit more involved here. Because not all scales are played with open strings, you need to learn how to play scales with mostly or all fretted
notes. So we're moving up to the key of A Major for the next two examples. The object is to free you to be able to move any scale into whatever key you
require to be able to play a given song.
Play this next example, in A Major, slowly to get the sense of how the pattern you're playing works. Scales are just patterns after all, and as you begin to
recognize certain patterns in how you play a given run, you'll find you can memorize things easier as a result. It's kind of a visual thing. So, play the next
example, using the suggested fingerings, and make any adjustments you need for your particular finger size and length.
Now we remove all open string notes. We're still playing the A Major scale, but with all fretted notes. This version is movable up the fret board because it is
played without open strings - which is what makes it movable. Pay attention to the patterns, as mentioned before.
Once you are comfortable with this pattern, move it up one fret to A#, then B, then C and so on. Ideally, any given scale should be able to be played
everywhere, in every key. This will ensure your mastery of the fret board. And it will take time, so allow yourself the time it will take - which is different for
you than for me, and that's okay. But here's the long range reality: even after playing music all my life, I still practice scales because proficiency must be
maintained!
We'll cover the primary minor scale in a future lesson.
And, until the next lesson, have fun with this and try creating some melodies now, to help you navigate the scale and become comfortable playing single notes on the
instrument. Start with simple stuff, like "Mary Had A Little Lamb" or "Twinkle Twinkle Little Star". And remember: have fun!
Now, start makin' some foot stompin' music!
Next
Previous
Home