
Up to this point, you've learned some chords now, and you learned the Major scale. In this lesson, we're going to work on strum patterns, which are integral to rhythm
playing in songs. If you can't keep a steady rhythm, you're no good to an ensemble situation. You will pull the other players off beat. This is a bad thing.
So let's make sure you can play in steady time and stay on beat! You will require a metronome for this lesson, and future learning. If you already play guitar, and
are adding the mandolin to your instrumental abilities, you probably already know this stuff - but it's a new instrument, so maybe a little "review" wouldn't be a
bad idea? It's up to you.
Part of what makes a song “feel”
a certain way is the manner in which you strum the chords to create what is
called rhythm.
In this exercise, we’ll go over a number of typical rhythm patterns you can work on and use to begin to create your own ideas. Remember, these are like
“templates” and you can do whatever you want to change them. What makes rhythm work is their cyclical nature – the essence of what rhythm is – a repeating figure. Before we begin, a little detail on what you’ll be looking at, and how to “read” it.
Below is a graphic of a quarter note – which equals one beat in length. It has a note head (the big dot) and a stem
(the vertical line). Next, you'll see an eighth note, which equals one-half beat in length. It has the note head,
and a stem, too; but it also has a "flag" or "tail". So the quarter note gets the beat (1,2,3,4), and it takes two eighth notes to equal one beat
(1 &, 2 &, 3 &, 4 &)
Pretty easy to understand. And, when two or more eighth notes are played, one after the other, they are
connected by a “beam”, a thick black line, which you see in the third graphic below.
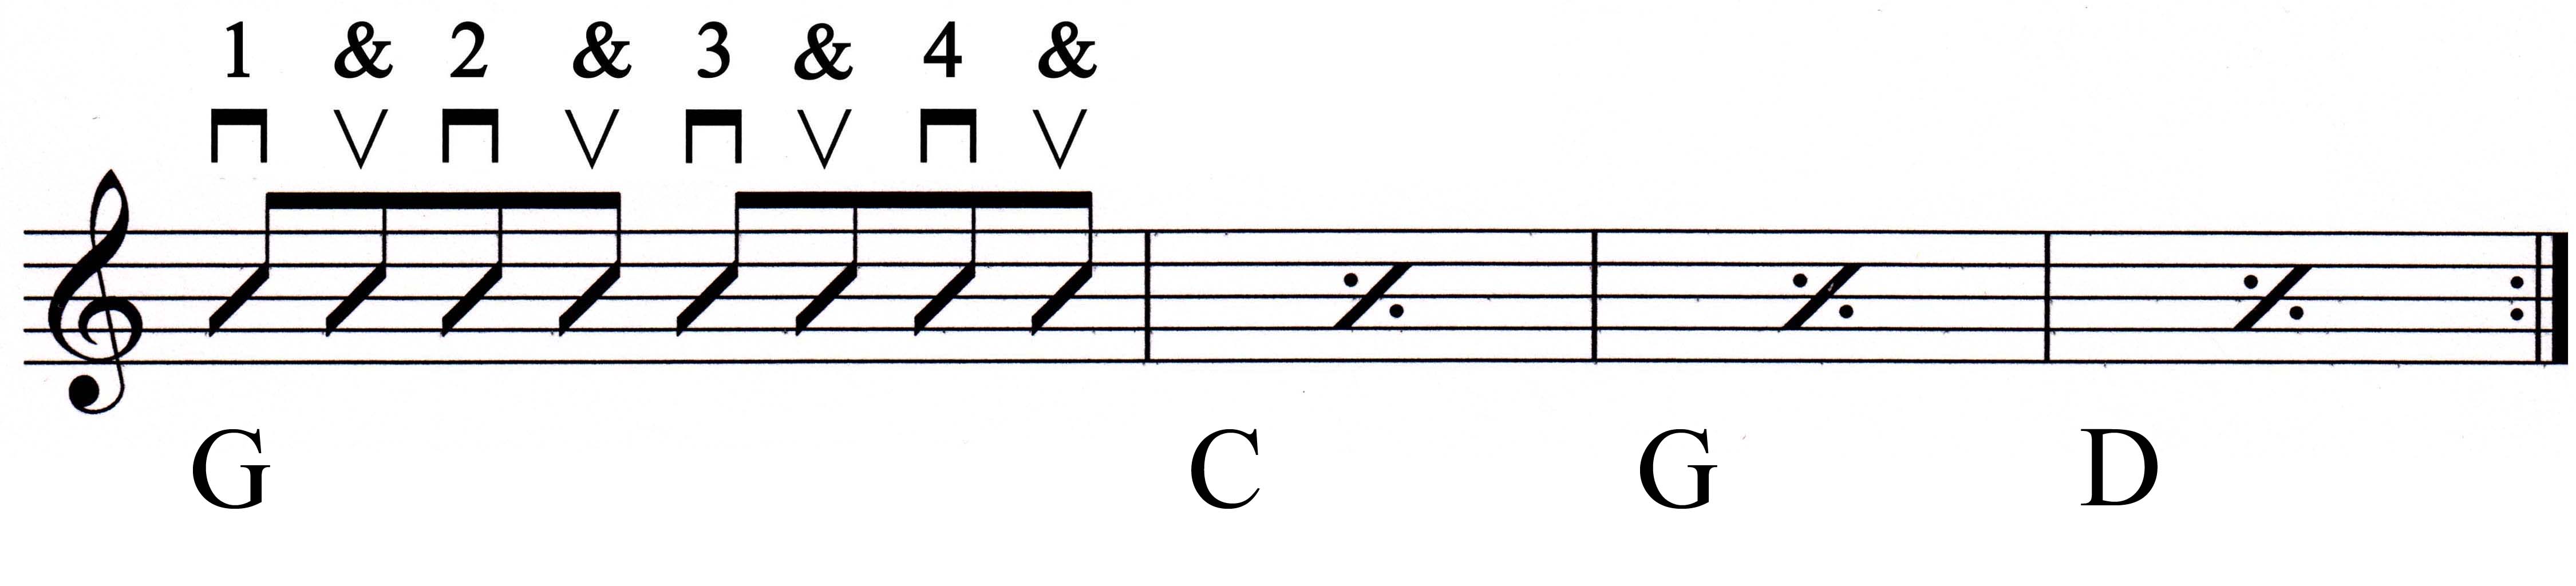
We’ll start with an easy pattern, a simple down stroke motion of the
strumming hand over the strings. This pattern is quarter notes, so one per beat. Set your metronome to around 60 beats per minute (bpm), and just play the down strokes
on the beat to get aligned with the metronome. You don't have to play a chord, just rest your fingers over the strings to create a muted raking sound as you
strum.

Once you're doing that pretty well, try bringing in the up stroke, raking the strings with both a down and an
up stroke. If your strumming is uneven, set your metronome to about 100 bpm, and strum down on the click and then up on the very next click, then down on the
next click after that - alternating between the down stroke and the up stroke on the strings with every click of the metronome. This
helps you to fully understand the timing of a typical strum. Strum the pattern shown below.

This pattern establishes what we'll call a "steady state" strum, or cadence. It is played smooth and even, not jerky. It's important to understand that most rhythms you play will employ this motion in one way or another. So, once you are comfortable with the strumming motion, it's time to play some chord progressions and work the strum pattern out, along with creating smooth transitions between the chords. So we'll start with the "straight eighths" pattern and some easy chords.
Be sure to count along, out loud (!), as you play, so you can understand the timing, where the beat occurs - very important, no matter what style of music you play.
And when you are comfortable moving between the chords, try bringing the metronome in to help you stabilize your time keeping. The pattern is G, C,
G, D; repeat without skipping a beat.
I cannot stress the importance of the metronome enough. Even after 50 years of playing, since I was a kid, I still use a metronome when I practice. Once you have a given piece of music, a progression or part you're working on fairly well figured out, you should always bring in the metronome to help you make it nice and tight, smooth and flowing. Other musicians will expect you know how to keep time. Use of a metronome will make that a certainty!
Okay, now that you're comfortable with the steady state idea, let's add a "ghost strum". A ghost strum is simply a strum stroke made, but without playing the strings. You maintain the "steady state" flow of your rhythm, but ghosting creates a different "feel" to the rhythmic pattern, even the atmosphere of the progression. By altering when you play within the steady state pattern, you can create different moods that reflect the content of the lyrics being sung over the progression.
So, let's start simple with the ghost strum playing the following pattern. You continue playing the down and up stroke motion, nice and even, but you will skip actually playing the
"&" of the 1st and 3rd beats (though you will "play" the motion of the stroke without striking the strings). This is shown in parentheses and a red up stroke, letting the strings ring
through until the 2nd and 4th beats, where you will play both down and up strokes of those beats.
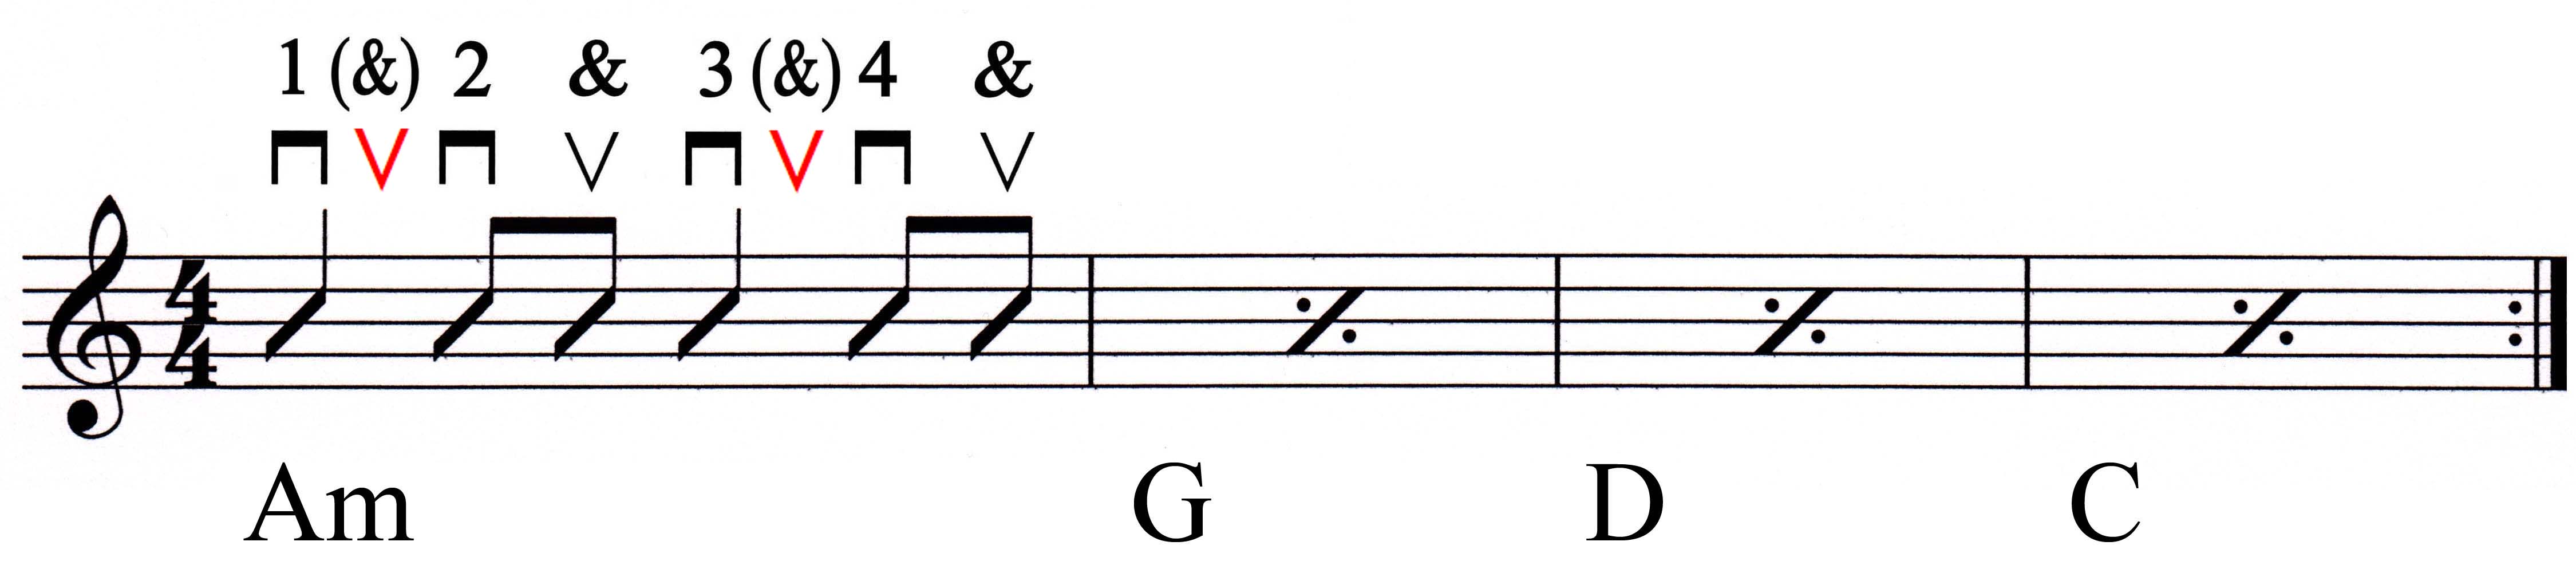
Do not rush the ghost stroke, thinking you won't have time to make the next played stroke. If you maintain a steady rhythm, you'll always get there in time - no need to alter the flow, the steady down and up motion of your arm!
A good way to make sure you are playing the rhythm strum correctly is to to speak it out loud. Count everything, but whisper the ghost strum bits. This way, you'll hear the rhythmic flow. Then all you have to do is duplicate it in your playing - but maintaining a steady state down and up stroke in your strumming arm, and simply ghosting the strum where indicated.
Okay, once you are comfortable with this idea, move on to the next rhythm. Do the audible call out before you play, so you know what you are aiming for. Take your
time and just play through the progression. Remember, ghost strums are shown in red.
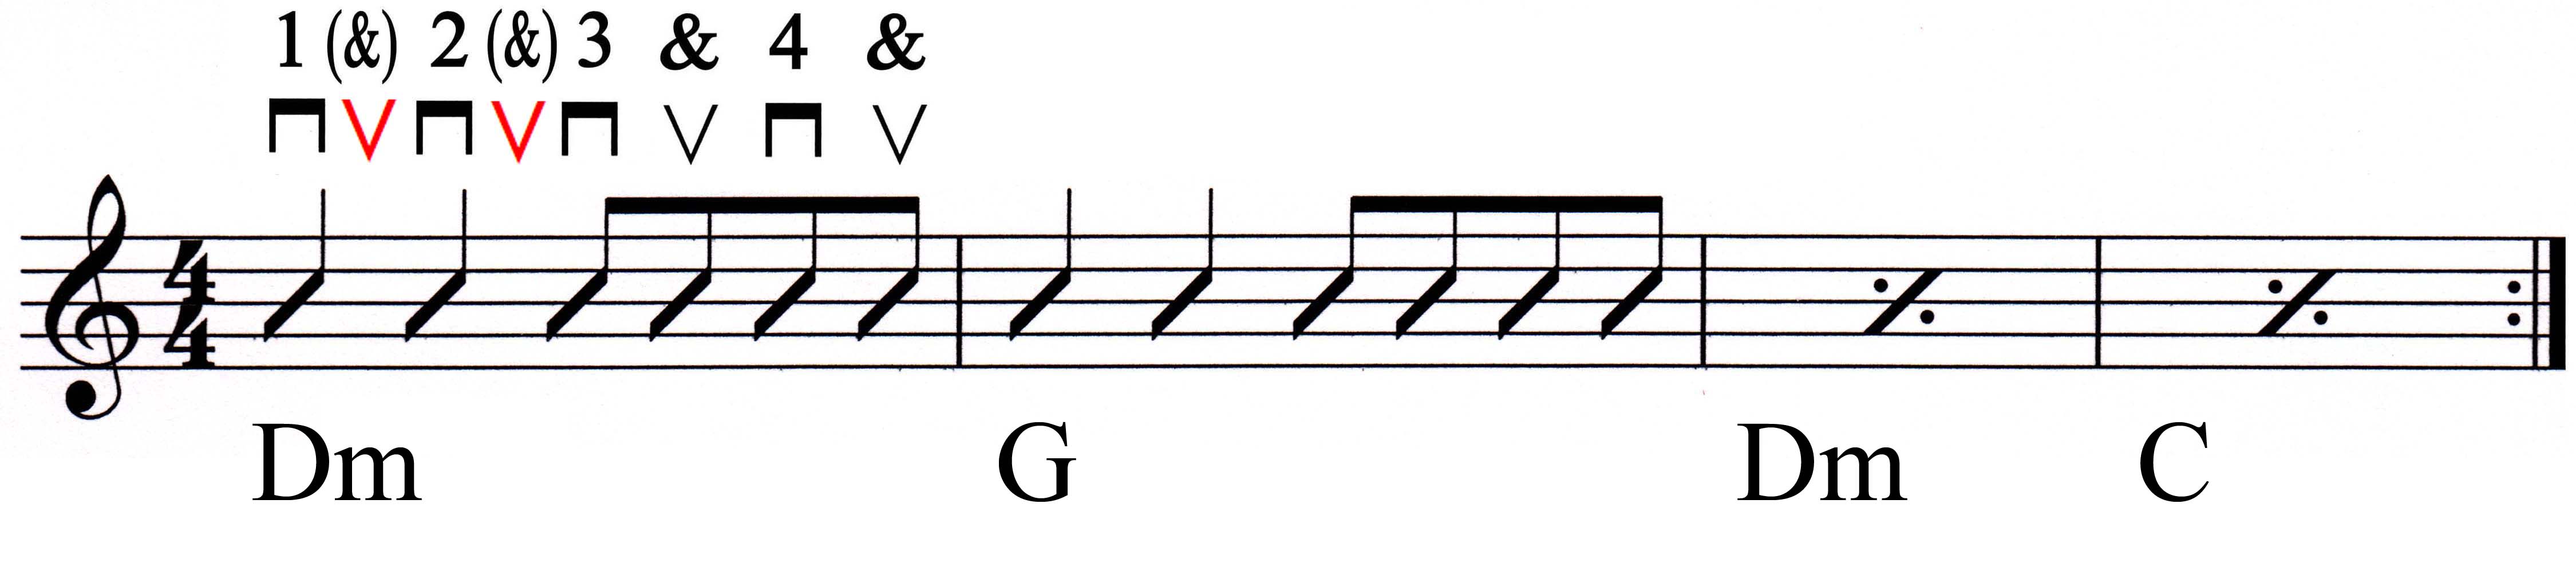
Don't forget to bring in the metronome once you are comfortable playing these progressions.
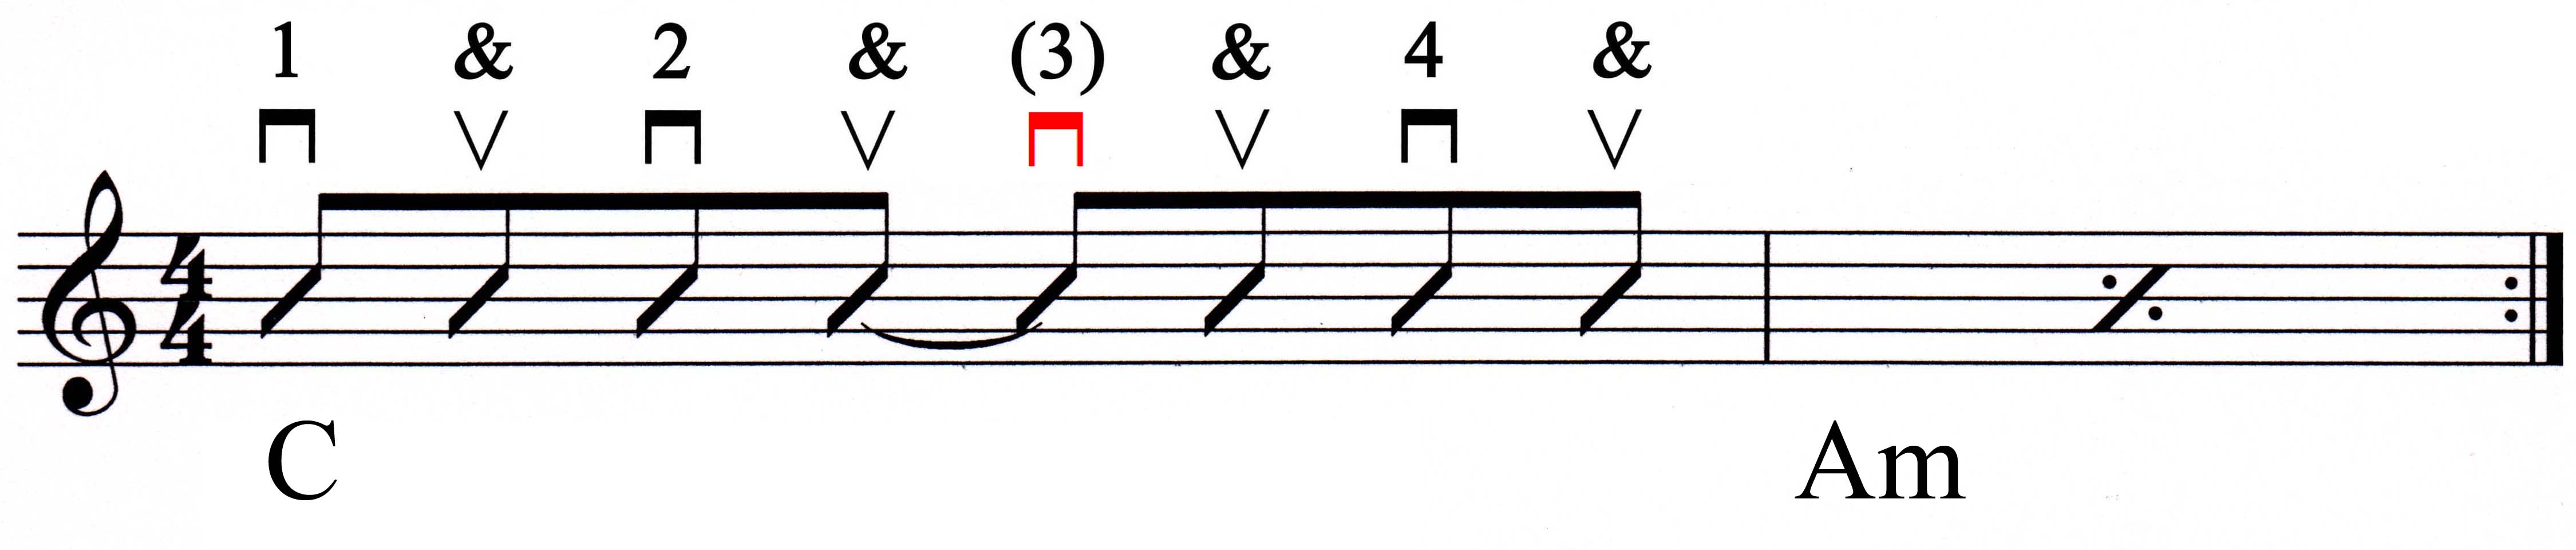
Okay, now we're going to introduce something called a "tie". In the next rhythm pattern, there is a little curved line joining two notes together; it's called a
tie and means you carry the strummed note over, let it ring by way of a ghost strum. Here it occurs on the 3rd beat, again shown in
red. Take a look and give it a try.
There are, of course, more strum patterns, but this gets you started. Just play through these and get them memorized and flowing. You'll be strumming away in no time!
You can replace the chords in the rhythm patterns we've covered today with any combination of chords you want. One suggestion is to create little 2" sized pieces of paper and write a chord on each one. Do this with all the chords you know, put them in a bowl, and randomly pull out three or four of them. Play one of the rhythms you've learned, one measure per chord. Set those aside and pull out three or four more, play them, put them aside and repeat the process. This way you will be playing every chord you know in random sequences to establish the fact that you need to be able to move from any given chord to any other given chord smooth and in time. That is how music works.
Next time we'll introduce a little tune you can learn to play - so bone up on your scale playing!
Now, start makin' some foot stompin' music!