The mandolin has been around for quite a long time. A descendant from the Oud, a Middle Eastern instrument, and the Lute, the mandolin shares the same scale length and
string order as the violin. It is most easily played strapped over your shoulder, due to the awkward shape and center of balance, with the peg head angled up.
The tuning of the mandolin, low to high, is: G, D, A, E. See the graphic below.
As a reference, on the piano, the low G is tuned to the G just below Middle C (C4), or G3. Middle C, for those of you unfamiliar with the term, is the C tone located
right under the piano's maker label. D is tunded to D4, the D tone right above Middle C, the A to A4 and the E to E5. You can also get a pitch pipe that is specific
to violin/mandolin at your local music store.
Having eight strings, or four courses of two strings - as would be the "official" way to put it - you would think the mandolin is difficult to tune. Not so much
once you understand a little trick you can use to speed up the process.
The "trick" to tuning a mandolin is to tune the lower of the two strings in each course. Then bring the second string up to the same pitch. You'll hear a kind of
"wa wa wa" sound as you tune the second string; it will slow down and disappear when you match the pitch. If that doesn't make sense, it will once you begin to tune
the instrument. Repeat for each subsequent string. It's not difficult once you get the hang of it and will make tuning up the instrument go much quicker.
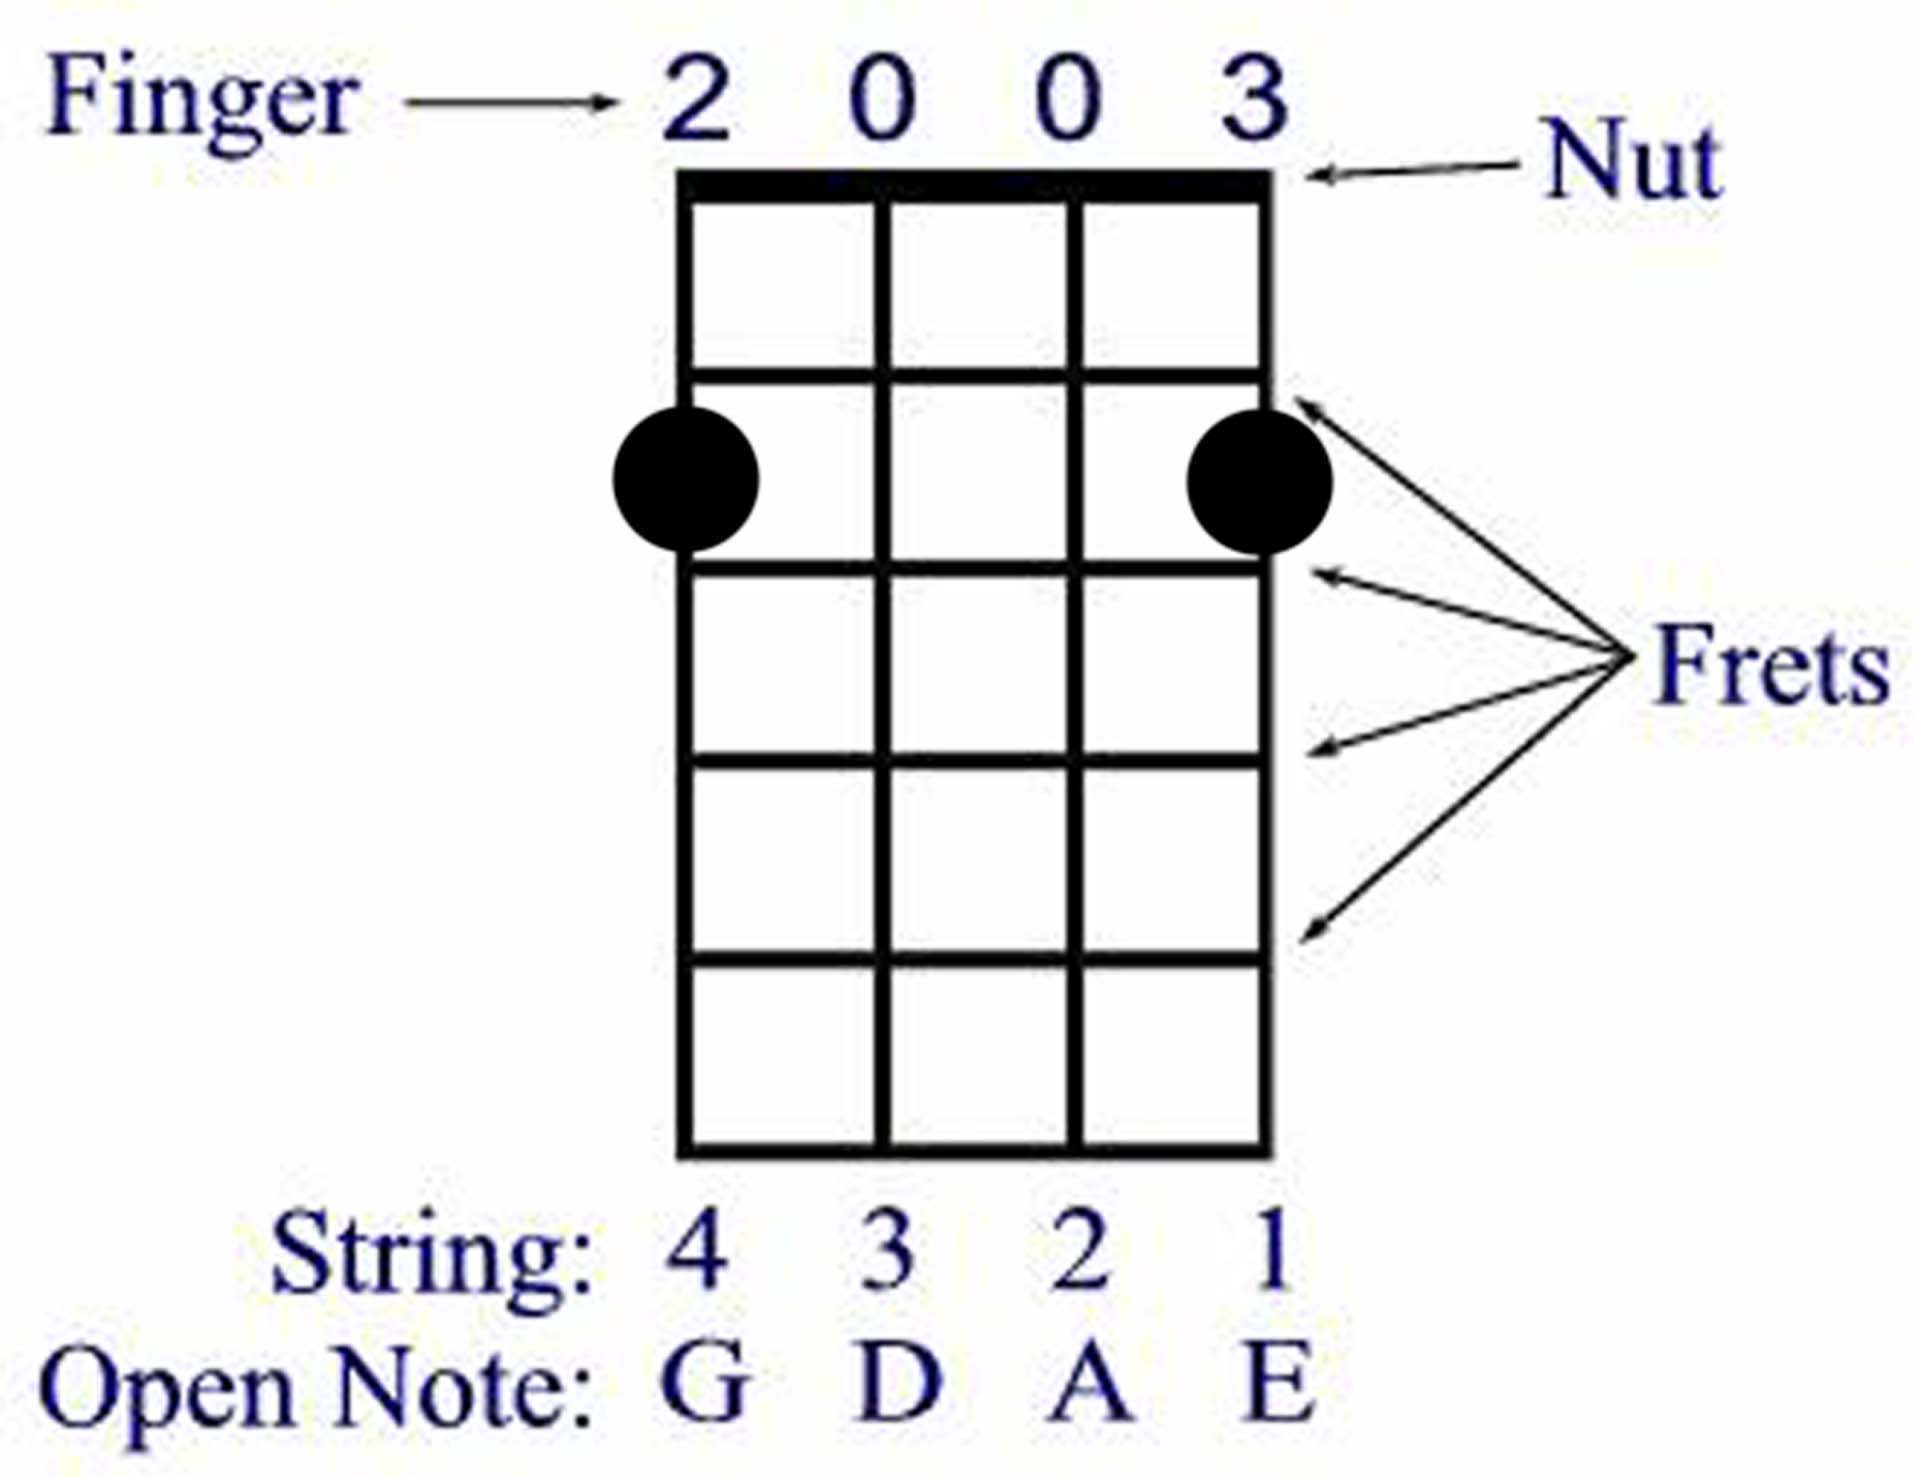
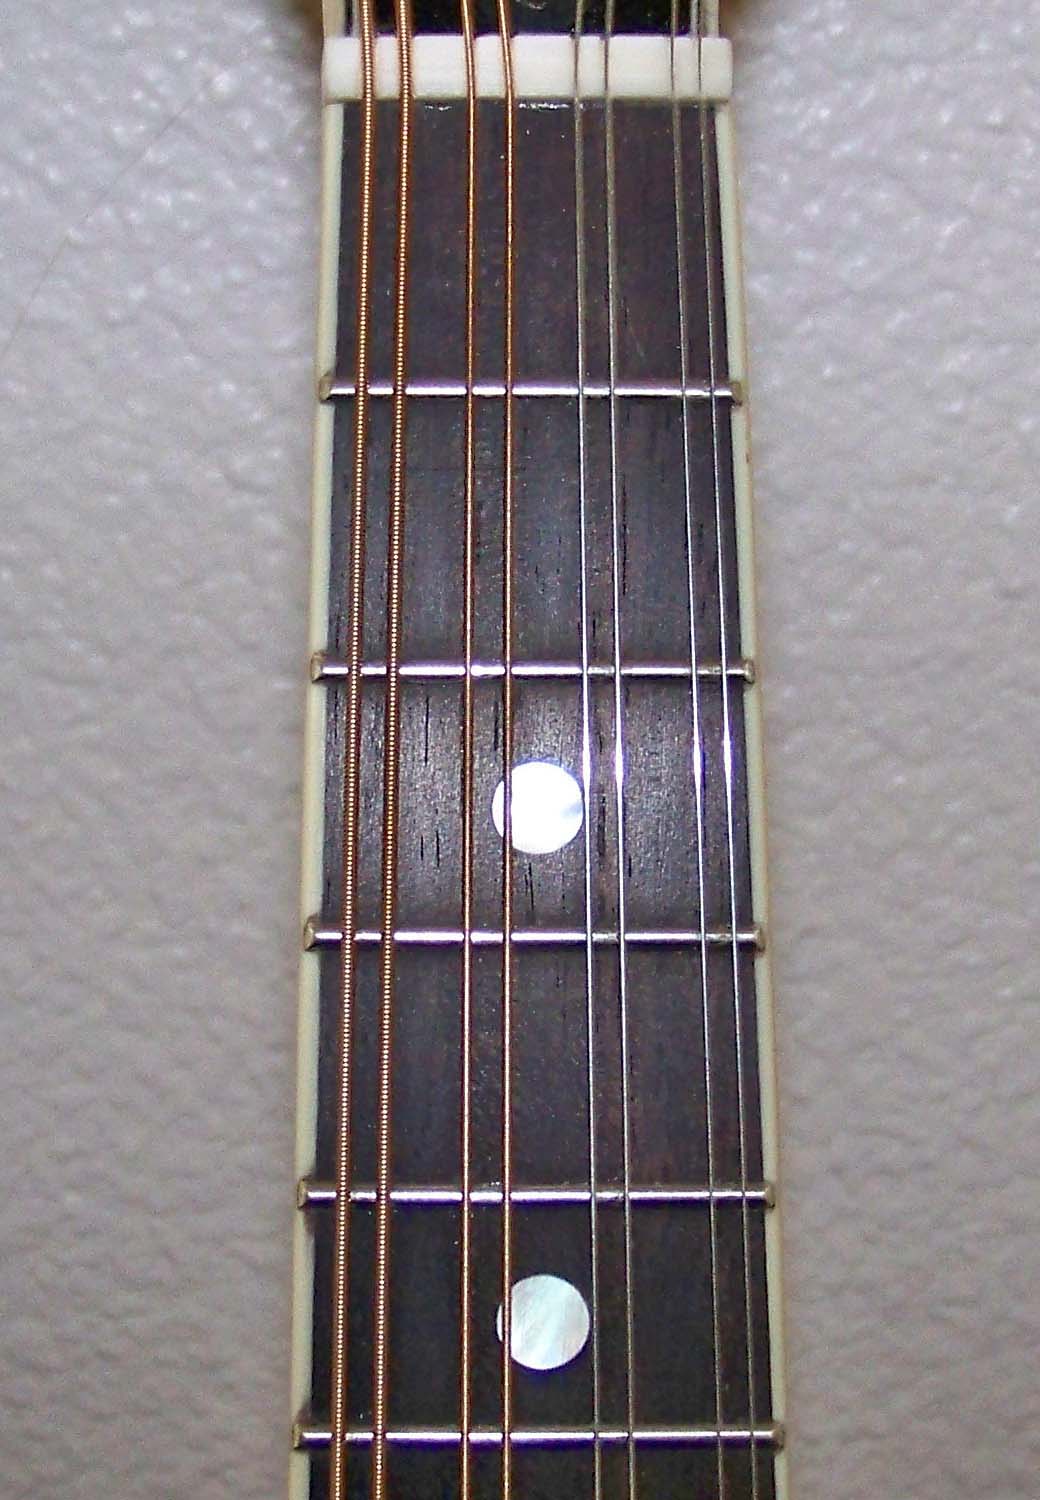
Okay, so let's take a brief tour of a diagram that will show the layout of everything you'll need to know to get started. Below is a graphic describing the bits
you'll want to memorize, to help you read how to play the chords. I've included a pic of a mandolin showing the same area to compare and make it a bit more clear.
This same graphic is what will be used to show you how to play chords, too. So let's get started with a few basic chords, a G, C and D chord.
Note that the open circle is the "root" note, the "key" of the chord. The D chord has the open 3rd string as the root tone.
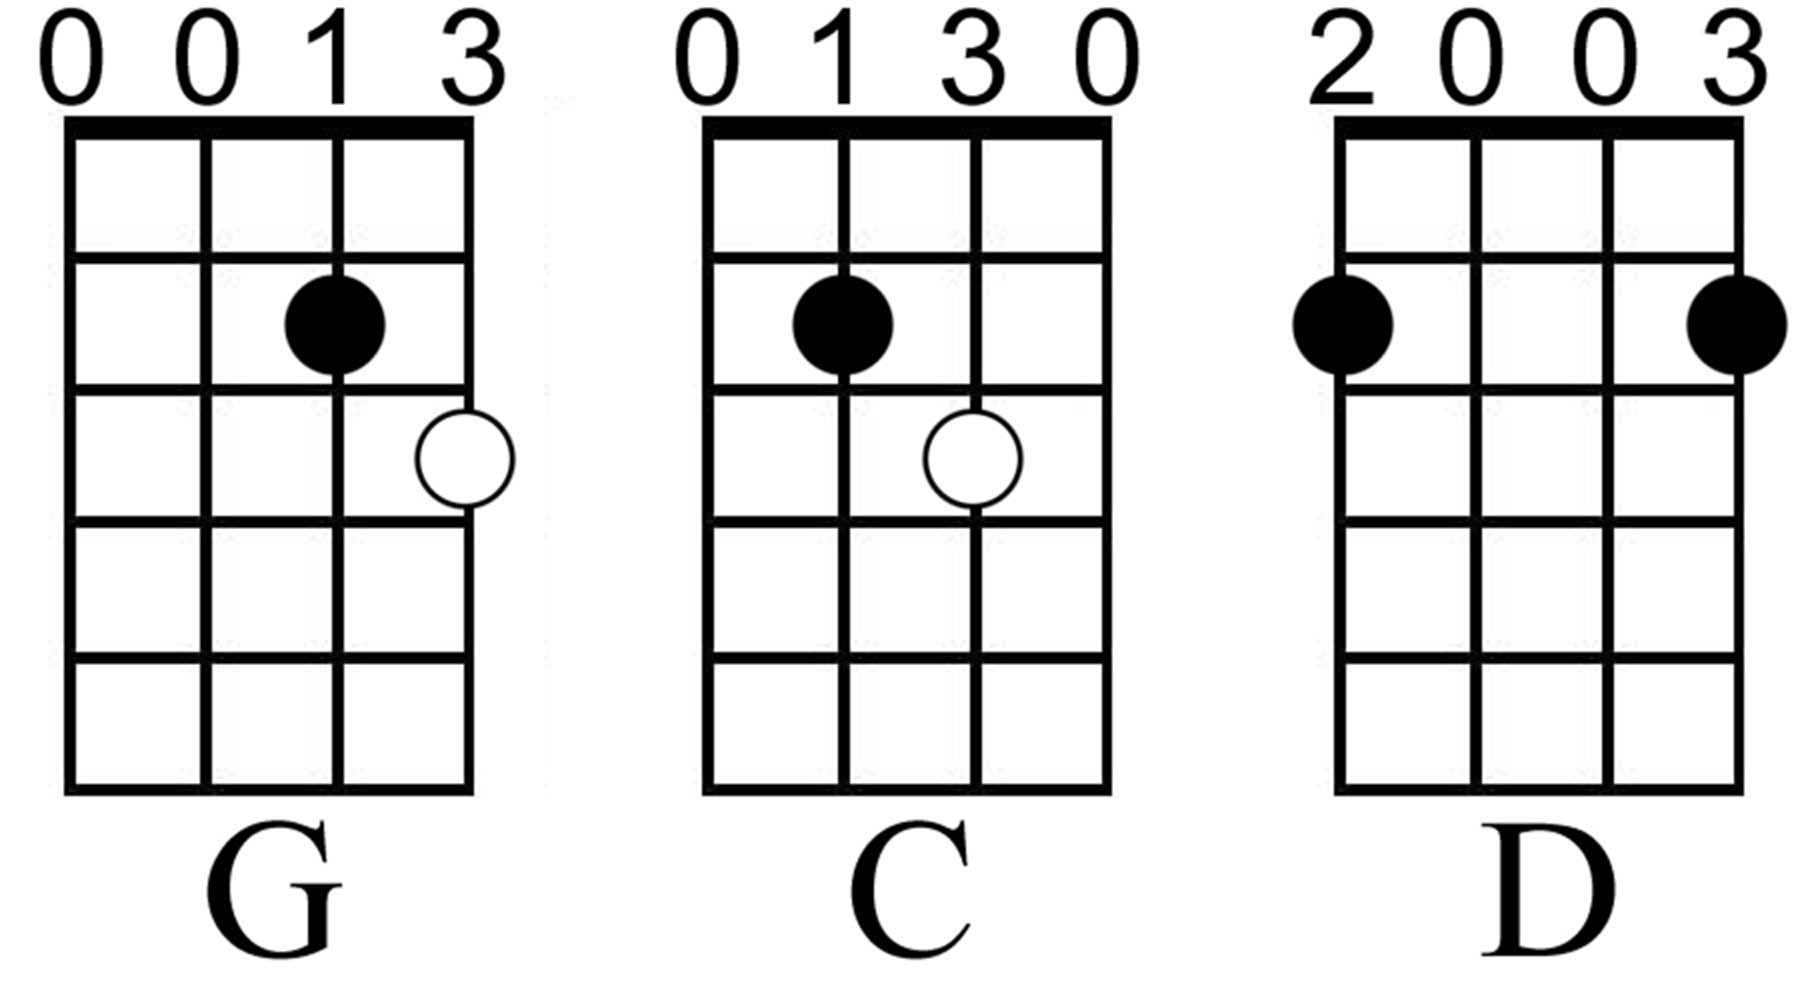
The fingering is subjective, based on preference and finger size. These are the fingerings I use, but for the G and C chords, you can just as easily use your 1st and 2nd fingers, too. For the D chord, I do actually recommend the displayed fingering. You may choose to change your fingering of chords over time, based on a number of factors, it's up to you. Just make sure it's practical, and most importantly: useful!
Take your time to get comfortable with playing on such a small neck, too. This is true if you're used to guitar or bass. I know guys with pretty big hands that can play the mandolin, so finger size isn't a major factor, but it will take time to become comfortable, regardless of finger size.
Once you've played through the three chords and gotten a sense of how to play them, you'll want to take these chords and put them into a context. So let's put them
together into a progression to get you moving around. Don't worry about keeping good time right at first. Just learn to move between the chords. The chords are listed
above each measure; you'll see four diagonal lines in each measure, called slash marks; they represent how many beats, which in this case is four, each chord will
be played before moving to the next chord.

So, simply strum across all four strings (yeah, there are actually eight, but we simply use a "shorthand" and say four), using all "down" strokes, creating a nice and even sound so you can hear all four of them at the same time - four strokes - then move to the next chord for four more strokes, and repeat throughout. Don't jerk across the strings, simply drag the pick across all four of them quickly, but without hurrying. Each chord gets four beats. Then, at the end, you just start at the beginning again. That's what the two dots at the end next to the thin and thick vertical lines means: Repeat.
When you are comfortable with moving between the chords, bring in the metronome and set the tempo at around 56 beats per minute (bpm) or so. If that's too fast, slow it down. The object is to play smooth and even, making smooth transitions from one chord to another, in time (with the click of the beat on the metronome). Take your time and allow yourself that this is new to you, and so you're going to be a little clumsy for a while.
For the next three chords, we're going to give you three chords that don't rely upon open strings to play. Many chords you'll play can't be played in the open, or first postion, next to the nut. On the mandolin, they're not difficult to play, but will require some effort to make sound good. It's all worth it, so don't be discouraged if you don't get this at first.
The three chords are A, E and B7. Note the "arch" in both the A and B7 chords. You play the notes that are "joined" by the arch
with one finger, laying on the fret board. Also, for the E and B7 chords, notice the number next to the diagram. This represents the fret
you will play the chord at to make it sound right. Therefore, the E chord will be played at the 4th fret, and the B7 will be played at the 7th fret.
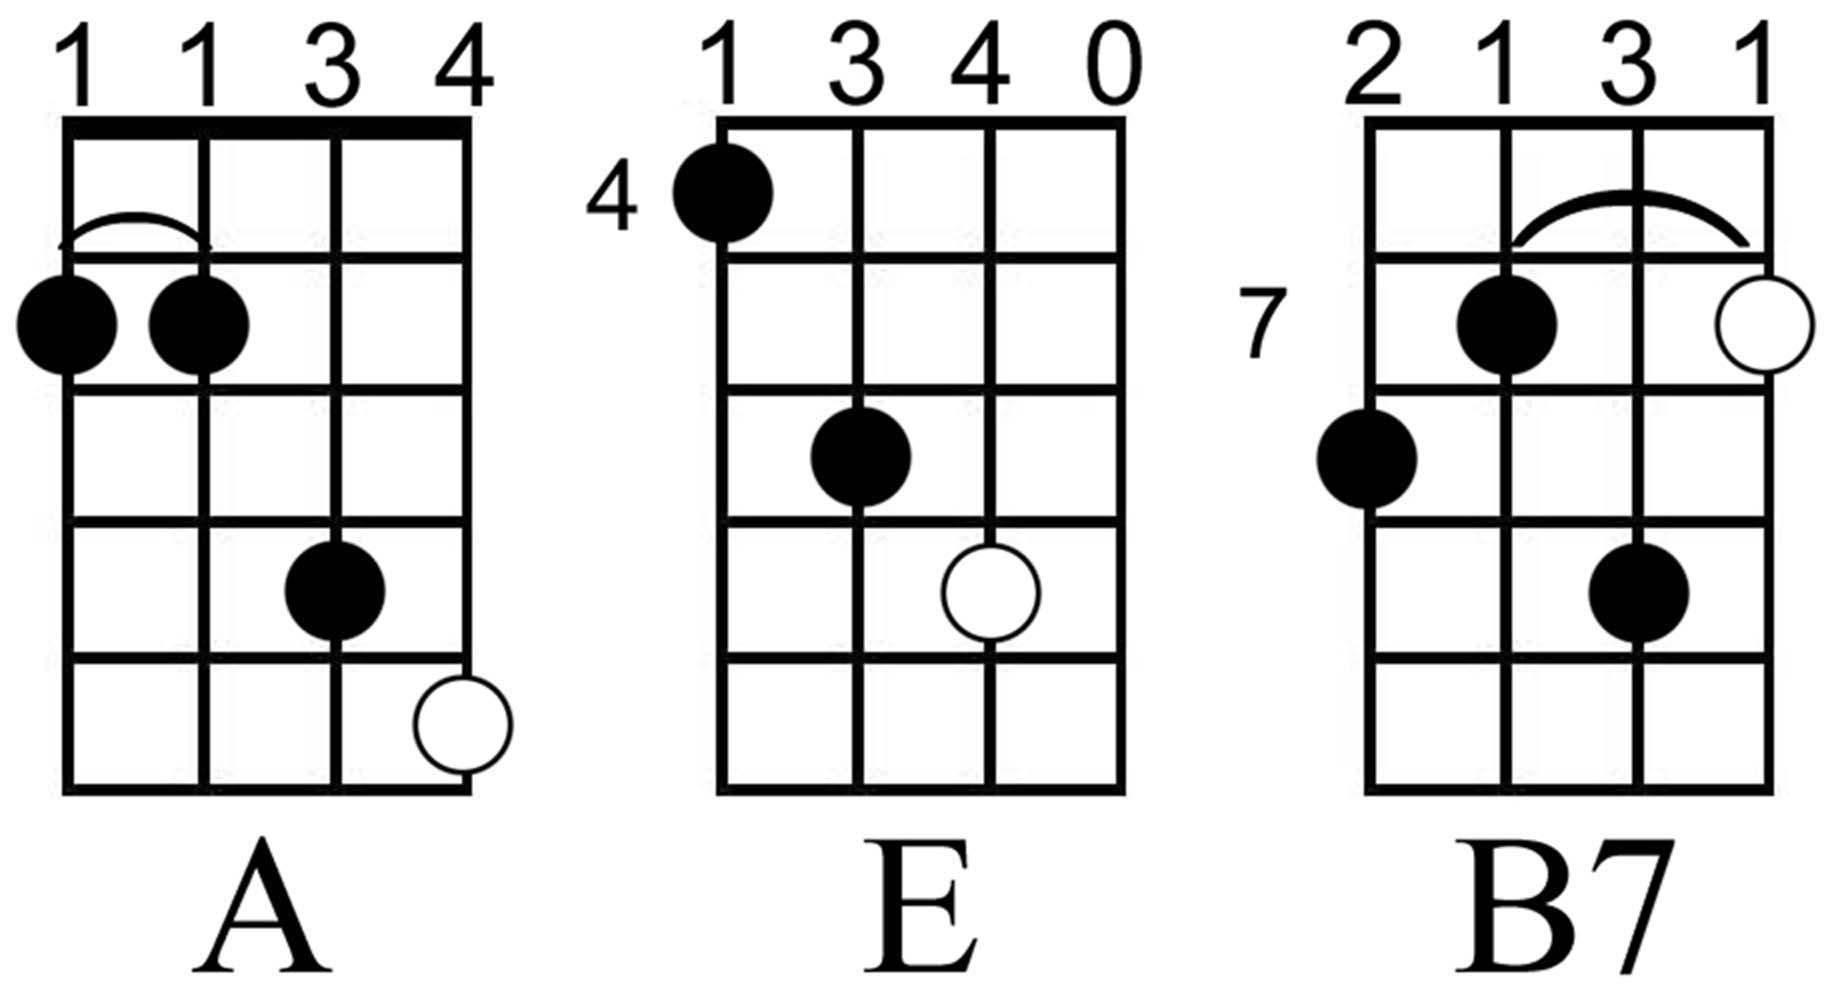
The E chord above does show an open string that can be played, which is also an E note, but which does not have to be played. It's your choice here.
These chords, as said above, are going to take a little time to play well. So, again, cut yourself some slack and accept it will not come right away for some of you. Also, remember, the open circle is the root tone of each chord. And the fingering is the recommended way to play these.
One of the cool things about chords with no open strings is that they are movable, and so considered a "form", which is a fancy way of saying "shape". Move it up and down and you have another form of the given chord type being played, but in a different "key". This brings us to an important thing to remember:
Chords are not "key" dependent. They are forms (how played) and types (major, minor, dominant, etc.) and are not tied to position (when they are movable forms).
So, for example, move the A chord up two frets, to the 4th fret, and you have a B major chord; move the B7 chord down two frets, to the 5th fret, and you have an A7 chord. Move the E chord down two frets to the 2nd fret, and you have a D chord (but don't play the first string here!).
As before, we want to put these into a progression to learn to move between them. So, here is a nice little progression with these three new chords.

Once you feel like you can play it pretty smoothly, bring in the metronome, again at around 56 bpm, and play in time - a very important part of playing music, as you may already know!
Bonus Exercise:
Create your own progressions. How you can create a progression is easy. On small squares of paper, write down each chord, put them in a bowl, then pull them out in groups of two, three or four; then play them in the order you pulled them out, four beats per chord. As you learn new chords (by moving them or in future lessons), write them down and add them to the bowl.
Use each chord once in a cycle. So, if you pull four chords out, play the progression, then set them aside and pull four more chords out and play them - in order pulled - in a progression. When you run out, put the used ones back in the bowl and pull them out again and play the progression.
This is not a strictly "musical" exercise, but one designed to help you learn to move from one chord to another, regardless of what it is or where it is on the fret board. This is an important ability!
Once you are really comfortable with this idea, try shifting each of the three movable chords around and identify what they are, write them down on a piece of paper and add them to the bowl. Remember, the open circle is the "root tone" of the chord, the "key" of the chord that will identify where it should be played.
One last thing you'll need is a fret board diagram. It is important to memorize all the notes, at least up to the 12th fret. This is where the majority of your
playing will be done, between the nut and the 12th fret. And when you move a chord around, it's nice to know what key it now is being played in! Here's a downloadable
chart:
Mandolin Notes
That will wrap it up for this lesson. I know it's a lot of material to absorb, but you will appreciate the amount, and the encouragement to make stuff up, move the chords around and just getting comfortable with the mandolin in general. It's a fun instrument to play!
Now, start makin' some foot stompin' music!